Näytetään tekstit, joissa on tunniste Water marbling. Näytä kaikki tekstit

14.5.2013

Vesimarmorointia

Niin tässä nyt vaan kävi, että päädyin Jäkeen! Hihi ^__^ Kävin siis Pauliinan luona, ja meillä oli oikein tapahtumarikas päivä! Päivämme alkoi mm. kilpikonnan pissan siivoamisella ja hämähäkin tapolla :D Tarkoituksenamme oli kuvata kulmakarva- ja vesimarmorointi-tutoriaali, mutta aika vierähti todella nopeasti, ja päädyimme vain vesimarmoroimaan pikaseen Pauskun kynnet. Lakkoina käytin Flormareja ja jotain hopeista. :P 

Klikkaa tästä vesimarmorointi-tutoriaaliini.


Ja loppuun vielä sananen kuvankäsittelystä. :D Tarkkasilmäiset varmasti huomaavat kynsinauhojen blurrauksen ylläolevassa kuvassa. Pauliinalla on joku-hieno-termi-tähän eli kaikki stressi (lue: Suomen jääkiekko-ottelut) purkautuu kynsinauhojen pahoinpitelyyn. Allaolevan kuvan voi klikata suuremmaksi. Sitä ei ole muokattu yhtään. Kuvasta huomaa myös kuinka luonnonvalo helposti saa kuvan näyttämään washed out eli värit eivät toistu yhtä elävinä kuin tosielämässä. Todellisuudessa nämä kynnet lumosivat meidät molemmat ja pomppasivat todellakin esiin!

3.5.2013

Water marbling with Liquid Sands

Vesimarmorointia OPI Liquid Sandeilla! Kuvioita oli vaikea tehdä, sillä ne levisivät, hajosivat ja värit sekoittuivat. Piti odottaa, että kuvio kuivui veden pintaan, ettei se leviäisi kynnellä. Toisaalta taas, jos odotteli liikaa, kuvio hajosi kynnellä (vasen etusormi). Plussana tosin se, että lakat kuivuivat kynnellä aika nopsaan eikä pikakuivattajaa tarvinnut kuten yleensä vesimarmoroinnissa. Lakat olivat myös aika haalean värisiä. Mutta onnistuin lopulta! :D Tykkään ehkä enemmän tuosta spotted-marmoroinnista kuin perinteisestä lookista. Tahdon kuitenkin antaa varoituksen sanan: jos tavallisilla lakoilla pisaroilla marmorointi on hankalaa, Liquid Sandeilla pisaramarmorointi on huomattavasti hankalampaa! Kuvio ei "supistunut", oikeaa väri-intensiivisyyttä oli lähes mahdotonta saavuttaa, ja reikiä oli paljon vaikeampaa saada oikea määrä oikean kokoisina. Näin lyhyesti :D

So I did some water marbling and spotted water marbling with OPI Liquid Sands. It wasn't easy, as I had suspected, but I think I pulled this off quite OK. 

Problems, a plethora of them, included the following: 
- opaque coats = mission impossible, that's why I chose golden Honey Ryder because you can't really notice how un-opaque it is ;)
- really difficult to create patterns: they either broke apart, colors got mixed too much or became blurry just to my annoyance 
- which leads us to waiting time: I had to wait quite long and blow on the polish to make it dry so that it wouldn't become all blurry on my nail but if I waited too long, the pattern would break apart on my nail (left index finger)
- if you think spotted water marbling with hand sanitizer is difficult with regular nail polish, this is like that but x1000000000000 and ^1000000000000. At least. Opacity + the correct size of dots + right amount of dots = mission impossible vol. 2. Just to warn you.

On the bright side, I didn't need any fast drying top coat because it dried really fast on my nails ! :D And I actually prefer spotted look over traditional water marbling, despite the difficulties. ;)


 Opi Bond Girls - Jinx (red)
Opi Bond Girls - Honey Ryder (gold)
Opi Mariah Carey - Get Your Number (blue)

Mitäs piditte? Tullaanko Teillä kokeilemaan vesimarmorointia hiekkanesteillä? ;D
What do you think: will you be trying out water marbling with Liquid Sands? ;D

9.2.2013

Tutoriaali: vesimarmorointia pisaroilla

Kokeilin tätä jo pari viikkoa sitten, tuloksetta. Testailin vaikka mitä kaikkea! Hiuslakkaa, desinfiointiainetta, käsisprayta, eri kasvovesiä, vesisuihketta, oikeastaan kaikkea, mitä löysin suihketettavassa muodossa. Mikään näistä ei kuitenkaan tuottanut tulosta, joko reikiä ei syntynyt lainkaan tai reikiä tuli liikaa, jolloin koko kuvio hajosi. Pari päivää sitten, seuraava näky kuitenkin pysäytti minut: 


Se oli mielestäni niin kaunis! Pakkohan tässä oli kokeilla pisaramarmorointia uudestaan. Myös kynsinainen Mirva ilmoitti onnistuneensa tässä ja vieläpä ihan helposti! Tällä kertaa aseenani olisi kadoksissa ollut käsispray, ihan Ameriiikoista ostettu. Kyseisen manikyyrin keksijä cutepolish taitaa olla Jenkeistä, joten olin varma onnistumisestani tämän sprayn kanssa!

Ja oikeassahan sitä oltiin! Jes!

Ciate - Oil Slick
China Glaze - Liquid Leather

Jottei teidän tarvitsisi toistaa samoja virheitä kuin minä ja kärsiä epätoivon tunteita, päätin tempaista pienen tutoriaalin. :)

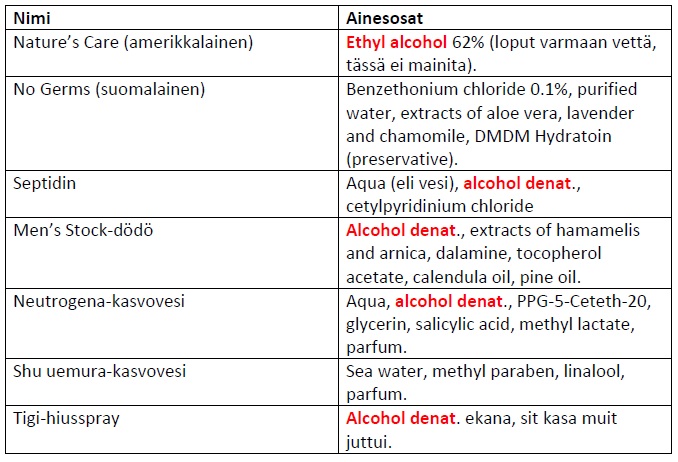
Kokeiltuani eri aineita, olen vakuuttunut, että eri ainesosat vaikuttavat eniten, miten reiät muodostuvat. Tämän perusteella voidaan todeta, että etyyli alkoholi (ethyl alcohol) toimii parhaiten reikien tekoon. Myös denaturoitu alkoholi sopii tähän, mutta muut aineet saattavat vaikuttaa sen kykyyn tehdä joko olemattomia tai liian isoja reikiä.


Muita muuttuvia muuttujia tässä tekniikassa:

Monesko kerta: Huomasin, että aina ihan puhtaalla vedellä, eli ekalla kerralla, marmoroitaessa, tämä ei ikinä toiminut! Nähtävästi vedessä ja astiassa pitää olla vähän epäpuhtauksia entuudestaan, jotta tämä onnistuisi. Joten älä ihmettele, jos ensimmäiset 10 yritystäsi menevät pieleen! Voit yrittää nopeuttaa prosessia suihkuttelemalla veteen käsisprayta. Kärsivällisyyttä ;)
Etäisyys: Yleisesti ottaen, mitä kauempana, sen parempi. Pidin kättäni ihan suorassa marmorointiastian päällä, noin metri, ja tämä toimi mielestäni parhaiten. 30cm oli jo liian lähellä, ja reiät rikkoivat kuvion.
Määrä: Tein yleensä vain yhden suihkautuksen, toka teki liian isoja reikiä/rikkoi kuvion.
Astian koko: Ensimmäisellä kerralla yritin pisaramarmoroida marmorointiastiassani, joka on paljon isompi kuin kertismuki. Kertakäyttömukilla tämä oli paljon helpompaa. Suosittelen ehdottomasti kertismukia!
Veden lämpö: Todella kuumalla vedellä pisarat eivät levinneet ollenkaan vaan jähmettyivät täysin paikoilleen! Eli huoneenlämpöinen vesi kannattaa ;)
Kynsilakkapisaroiden määrä: Tiputtelin kertismukiin aina lähemmäs 8 pisaraa, riippuen tietenkin kuinka paljon pisarat levisivät veden pinnalle tiputtaessa. Eikä kuvioni kutistunut kokoon kaikilla aineilla, kuten cutepolishin videolla, joten tämänkin takia saatoin tarvita enemmän pisaroita. Mitä enemmän käsidesiä suihkauttelee, sitä enemmän kuvio kutistuu ja musta väri tummenee, mutta toisaalta useammat suihkaukset riskeeravat kuvion hajoamisen liian isoilla rei'illä.
Kynsilakan paksuus: Jos tiputtelet liikaa kynsilakkapisaroita, lakkakerroksesta tulee paksumpi, ja reikien on vaikeampi muodostua. Jos taas kynsilakkakerroksesi veden päällä jää liian ohueksi, reiät leviävät jättiläismäisiksi.

Nature's Care - amerikkalainen käsispray
Toimi parhaiten! Kuvissa on pienempi lakkaläntti ja suurempi lakkaläntti. Kynsilakkakerroksien paksuudessa ei eroja.

Tigi - hiuslakka
En löytänyt sopivaa suihkimisetäisyyttä, joko reiät hajoittivat kuvion tai niitä ei muodostunut edes ohueen lakkakerrokseen. Hiuslakkani on aika lopussa, joten suihke ei ollut niin voimakas kuin mitä se on muistaakseni joskus ollut. Aineitakaan, kuten tuota haihtuvaa alkoholia, tuskin on pullossa jäljellä kovinkaan paljoa. Kuvassa reiät eivät siis ole läpinäkyviä vaan harmaita. 
Kuvat saa isommiksi klikkaamalla niitä.

Men's stock-dödö
Yksi suihkaus, ja koko huone alkoi haista männylle, yskitti enkä meinannut saada raikasta ilmaa keuhkoihini! Ei tehnyt reikiäkään... Johtuu varmaan noista extracteista ja öljyistä, joiden takia alkoholi ei päässyt rei'ittämään lakkakerrosta.

Neutrogena-kasvovesi
Teki tuollaisia suolennäköisiä kuvioita :D Jos tykkää suolista, niin mikäs siinä!

No Germs-käsispray
Teki liian isoja reikiä yhdelläkin suihkauksella. Yksi reikä on lähes koko kynteni kokoinen. Tähän voisi auttaa paksumpi lakkakerros, jolloin käsispray-pisaroiden on "raskaampaa" työntää lakkakerrosta ja täten tehdä reikiä siihen. En tosin löytänyt sopivaa kombinaatiota. :/

Septidin-desinfiointiaine
Ei tehnyt reikiä lainkaan tai teki niitä liikaa. Käyttäytyi todella epäjohdonmukaisesti. En onnistunut löytämään sopivaa kombinaatiota suihkimisetäisyyden ja lakkapaksuuden välillä.

Shu uemura-kasvovesi
Ei tehnyt reikiä. Varmaan sama juttu kuin olisi suihkinut pelkällä vedellä.

Ja loppuun pieni vinkki vitonen! Huomasin, että marmoroituani noin viisi kertaa, kynsilakkapisarat eivät meinanneet enää levitä veden pinnalle johtuen varmastikin käsispraysta (oikea yläkulma). Vedenvaihto auttaa tähän, mutta oikeanlämpöisen veden etsintä voi olla hankalaa. Tällöin tykkään puhdistaa veden pinnan kynsilakalla. Tiputtelen veden pinnan täyteen kynsilakkaa, kuten kahdessa muussa kuvassa näkyy. Sitten puhaltelen pintaan pari kertaa, jotta se kuivuisi nopeammin. Tämän jälkeen puhdistan veden kynsilakasta, ja tadaa! Vetesi on taas valmis marmoroitiin! :)


One thing that I noticed, is that alcohol works the best. Especially ethyl alcohol (Nature's Care hand sanitizer). Plain denaturated alcohol tends to be mixed in different sprays with oils and all sorts of extracts which weaken or strengthen its ability to make spots. Therefore, it is more unpredictable how it will act in water marbling. I think it tended to create spots too big or nothing at all. 

If your spotted water marbling / water marbling with drops doesn't work, here are some tips:

- Don't be discouraged if your 10 first tries won't work! I noticed that it took me quite a few times before this started working. I think the water needs to be a little "impure". You can also spray some hand sanitizer into your fresh water and see if this helps.
- The best distance for sprays is farther away! Even 30cm was too close for me, I think more like 1m is the best distance for spraying. Too close and the spots become too big or too far away, and you won't get any spots at all.
- I used only 1 spray, 2 sprays made the spots too big and broke the pattern.
- The first time I tried this, it was a complete fail. I think my dish was too big so I definitely recommend using a smaller plastic cup. Much easier.
- The temperature of the water needs to be approximately room temperature. If it was too hot, the nail polish drops wouldn't expand on the surface of the water. 
- I could never do with just 4 drops of nail polish. I always used at least 6 drops but more often 8-10 drops. My nail polish did not shrink with all the different sprays that I tried so with these cases I needed to use more drops. You could also spray more hand sanitizer if you've used too many nail polish drops. If you've used too little nail polish drops, you risk having humongous spots.
- If your nail polish drops won't expand when dropped onto water, try changing your water. Though this is a bit risky if you find it difficult to get the right temperature. In a case as this, I like to "clean" my water with nail polish (last picture, click on the pictures to make them bigger). I fill the water surface with nail polish drops, blow on it a few times for it to dry, and then clean the water surface from nail polish. And you're good to go! 

I hope this helps! ^__^ Good luck!

31.8.2012

Tutorial: Water marbling

So, it is said 1 picture > 1000 words.
Got some pictures right here.
And explanations in the end. Detailed ones.
Click on the pics to make them larger! :)

Water marbling - you either love it or hate it. I, however, learned to love it. The first maybe 20 times I stank, bad. Really bad. But after a year or so I tried it again, and it could not have turned out better! So encouraged by my newly discovered skills, I thought maybe I should share the love. Good luck! <3


Apparatus:
  • toothpick/dotting tool/orange wood stick (I prefer making the patterns with a toothpick for its small size and cleaning up my cuticles with something bigger like a dotting tool or orange wood stick)
  • tape
  • something underneath so you won't mess up your table (I like big, opened envelopes because newspapers have ink on them which can color your hands a lovely shade of grey)
  • paper towel for cleaning up nail polish residue stuck on your toothpick/dotting tool/stick
  • plastic cup etc. with luke warm water
  • nail polishes 2-3 bottles, preferably creme texture (which means no glitter or any sorts of shiny pieces in it; I like Flormar and Barry M)
  • recommended, though not compulsory: a good friend with a lot of patience to help (emphasizing the friend here, for if it doesn't work out, you can always curse this water marbling thing and enjoy a few glasses of wine together!)
Method:
tai (Finnish) = or (English)

  1. Prep your nail by cleaning it with nail polish remover. If this leaves an oily residue, wash with soap. Oil weakens the durability of your polish.
  2. Base coat. Makes polish last longer and prevents yellowing of your nails.
  3. Cut the tape before doing any of the marbling to prevent the possibility of messing up your marbles.
  4. Tape your finger. This will help with the clean up process a lot. Personally I don't like using tape because somehow I always end up messing my marbles when taking off the tape. Instead you can use hand cream around your nail (not on the nail or cuticle area!) because the oils will prevent nail polish from sticking onto your skin. I actually prefer doing my water marbles before I go to bed because in the morning, you can just lightly scratch off the nail polish from your skin. Saves time, easy and efficient! ;)
  5. Fill your cup with luke warm water. If water marbling just won't work, then you might want to add a few drops, depending on how much water you have, 5-20 drops of nail polish remover that doesn't have oils in it. Once again, oils + nail polish = won't last. Change your water after a few marbles.
  6. You can either use your nail polish brush for dropping drops of nail polish into the water or with the help of a toothpick (the smaller, the better), try to gather the nail polish in the brush into one big drop (bottom picture). Lightly pressing the brush against the bottle from just one side while taking the brush out, helps with forming the drop too (top picture).
  7. Drop the drop into the water! Don't drop it too high above the surface of the water since this makes the drop gather too much weight and it will not stay on the water surface. Instead it will sink to the bottom.
  8. Drop the next drop in the middle of the previous one. 
  9. Continue doing this until...
  10. You'll get something like this! Circles. The more circles you have, the more nail polish, a thicker layer, will end up on your nail. 
  11. Anchor your nail polish circles by pulling them onto the sides of the cup with a toothpick. 
  12. Make the pattern you like with a toothpick. I prefer a toothpick for its small size. Clean up in between strokes if your toothpick gathers too much nail polish residue (picture 15). Blow on the nail polish to make it dry a little. If the pattern is too wet, it might spread out on your nail and lose the "pattern". Instead it'll look like an ugly mess.
  13. Immerse your nail into the water as far away from the pattern as possible since there's always an outermost circle that is, unfortunately, see through. If you happen to put your nail under water too close, this will draw the pattern under water too. Then you'll have to start again. :( I personally find this method kind of difficult since it's hard to know where is the right spot to pull up your finger. 
  14. Dip your nail into the spot that you like the most. Keep your finger under water while with your other hand, take a toothpick and roll it between your fingers so it will catch up all the excess nail polish circles. Be careful with the finger under water, if it touches the sides of the cup or the bottom, it might ruin your nail polish.
  15. Clean your toothpick by squeezing it between two sheets of paper towel while pulling it out. If you decide to simply wipe your toothpick on top a paper towel, make sure not to mess up your arm on the wet polish residues.
  16. Take the tape off while the polish is still wet. If it has hardened, it might ruin your pattern. Be careful not to mess up the nails that have already been marbled. This is the part that I always end up doing wrong. Sometimes the tape touches the pattern that is still wet if I'm not careful, and messes it up.
  17. Clean up your cuticles from nail polish while it's still wet with a orange wood stick (since it's bigger than a toothpick). This won't work if the nail polish has dried. 
  18. You can decorate the "naked" parts of your marble pattern with a dotting tool/toothpick. Put a dab of nail polish on e.g. used tape from your finger, dip your toothpick into the nail polish and lightly dab some dots onto your nail.
  19. Compare pictures 16 and 19, the latter one has the dots.
  20. Clean up! I prefer a brush with short bristles that I can dip into acetone (nail polish remover). I don't like cotton swabs because they leave lint everywhere. So annoying. Make sure your dots are absolutely dry before putting on some topcoat. I prefer INM Out the Door fast drying topcoat. Now you can kick back and relax, you've done it! Be amazed by how skilled and talented you are! ;D

I hope you enjoyed this tutorial! :)
If you have any ideas about anything at all, please leave a comment! 

Xoxo,
Sininiiiiiiiiiiiiiiiiiiiiiiiiiiiiiiiiiiii :)

18.6.2012

Kynsiä kynsiä

Tässä parit kynnet matkan varrelta kommentein:

Näistä tuli mielestäni aika rumat ja epäonnistuneet. En oikein tiedä mikä olisi salaisuus onnistuneisiin vesimarmorointeihin, kuplia tulee aina ja kuvio ei näytä yhtään samalta kuin vedessä...

These turned out stupid.


Pitsikynnet, nämä kyllä kaipaisivat jotain bling blingiä. Laitoin myös päällyslakkaa pitsien päälle, koska näiden piti kestää jopa pari päivää. Jos päällyslakkaa ei laita, pitsi näyttää ja tuntuu ihanan pehmeältä (päällyslakan kanssa siitä tulee karheaa ja se jää joka paikkaan kiinni), mutta tällöin pitsi lähtee purkautumaan, jolloin se näyttää tuhruiselta. Kirjoitanko liian pitkiä lauseita? :D

Lace nails, these definitely need some bling bling to go with them. I put top coat on them so that they would last longer because the lace hardens but it also clings everywhere which is annoying. If I wouldn't put top coat, the lace would stay soft but it would last only one day because the lace starts to unravel.
Related Posts Plugin for WordPress, Blogger...